Windows Service-į§├┤ė├C#ŠÄīæWindowsĘ■äš│╠ą“łD╬─įö╝Üšf├„
░l▒ĒĢrķgŻ║2023-07-28 üĒį┤Ż║├„▌xšŠš¹└ĒŽÓĻP▄ø╝■ŽÓĻP╬─š┬╚╦ÜŌŻ║
[š¬ę¬]▄ø╝■Ą╚╝ēŻ║Ė³ą┬ĢrķgŻ║2013-03-01ĮĄ¹ū└├µĘ■䚎ĄĮy╣┘ĘĮ░µv2.2 ├Ō┘M░µ┴ó╝┤Ž┬▌dWindows Service-╚ń║╬ė├C#ŠÄīæWindowsĘ■äš│╠ą“łD╬─įöĮŌ╚ń║╬ė├C#ŠÄīæWindowsĘ■äš│╠ą“...
Windows Service-╚ń║╬ė├C#ŠÄīæWindowsĘ■äš│╠ą“łD╬─įöĮŌ
╚ń║╬ė├C#ŠÄīæWindowsĘ■äš│╠ą“łD╬─įöĮŌŻ║Windows Service▀@ę╗ēK▓ó▓╗Å═ļsŻ¼ĮķĮB┴╦╚ń║╬ė├C#äōĮ©Īó░▓čbĪóåóäėĪó▒O┐žĪóąČ▌d║åå╬Ą─Windows Service Ą─ā╚╚▌▓Į¾E║═ūóęŌ╩┬ĒŚĪŻĄ½╩ŪūóęŌ╩┬ĒŚ╠½ČÓ┴╦Ż¼▒ŠŲ¬▓╗Ģ■īæÅ═ļsĄ─¢|╬„Ż¼═Ļ╚½ęį╗∙ĄAæ¬ė├Ą─ąĶŪ¾üĒīæŻ¼╦∙ęį▓╗Ģ■ī”Windows Serviceīæ║▄╔Ņ╚ļĪŻ
ę╗Īó╩ūŽ╚äōĮ©ę╗éĆWindows Service
1Ż®äōĮ©Windows ServiceĒŚ─┐

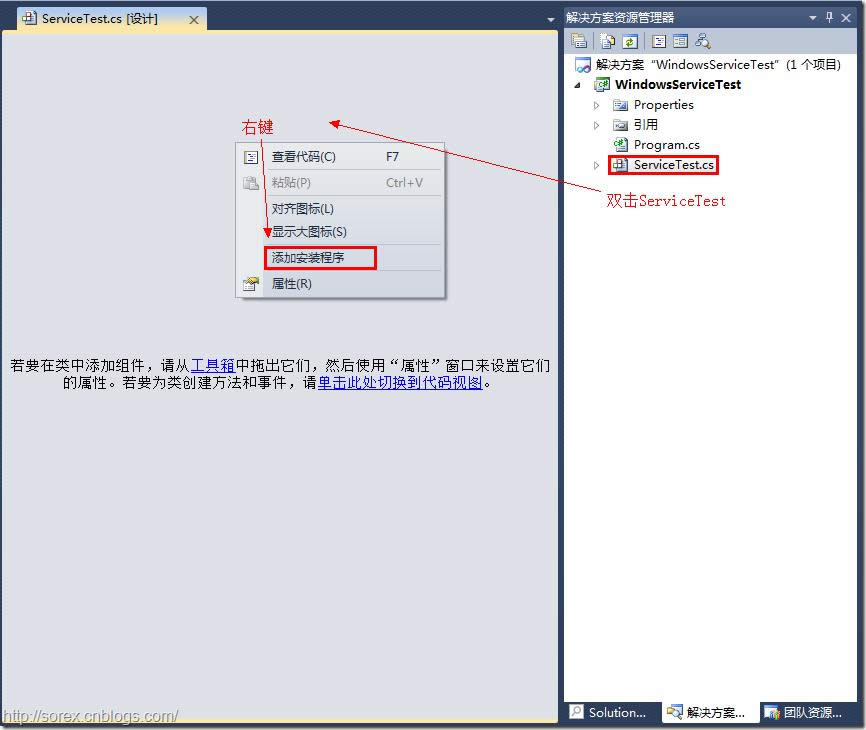
2Ż®ī”Serviceųž├³├¹
īóService1ųž├³├¹×ķ─ŃĘ■äš├¹ĘQŻ¼▀@└’╬ęéā├³├¹×ķServiceTestĪŻ
Č■ĪóäōĮ©Ę■äš░▓čb│╠ą“
1Ż®╠Ē╝ė░▓čb│╠ą“
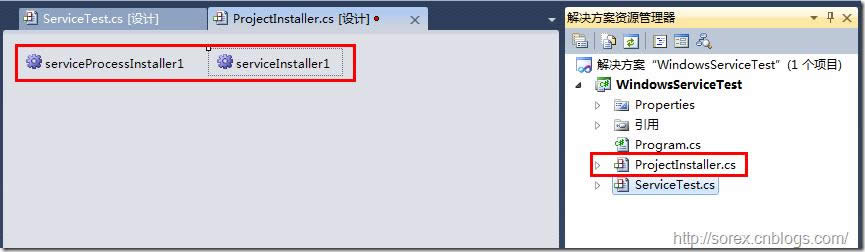
ų«║¾╬ęéā┐╔ęį┐┤ĄĮ╔ŽłDŻ¼ūįäė×ķ╬ęéāäōĮ©┴╦ProjectInstaller.csęį╝░2éĆ░▓čbĄ─ĮM╝■ĪŻ
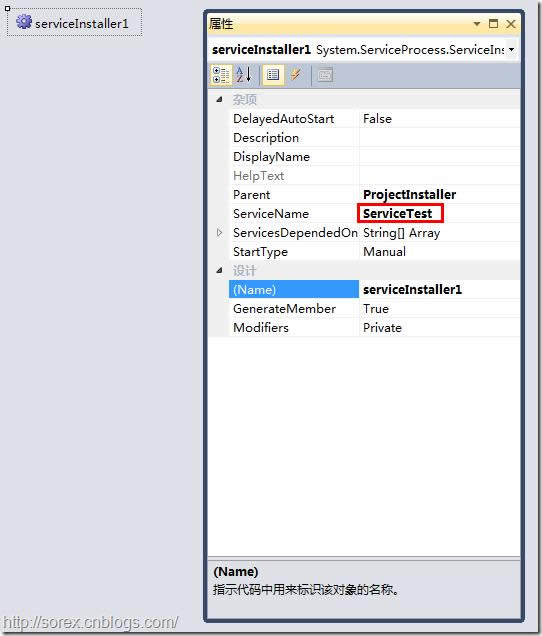
2Ż®ą▐Ė─░▓čbĘ■äš├¹
ėęµIserviceInsraller1Ż¼▀xō±ī┘ąįŻ¼īóServiceNameĄ─ųĄĖ─×ķServiceTestĪŻ
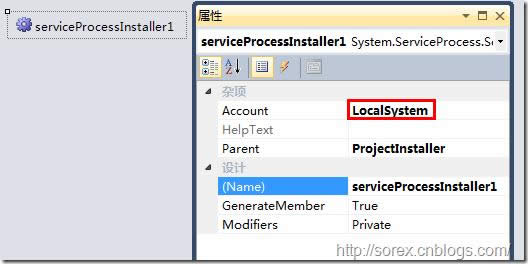
3Ż®ą▐Ė─░▓čbÖÓŽ▐
ėęµIserviceProcessInsraller1Ż¼▀xō±ī┘ąįŻ¼īóAccountĄ─ųĄĖ─×ķLocalSystemĪŻ
╚²Īóīæ╚ļĘ■äš┤·┤a
1Ż®┤“ķ_ServiceTest┤·┤a
ėęµIServiceTestŻ¼▀xō±▓ķ┐┤┤·┤aĪŻ
2Ż®īæ╚ļService▀ē▌ŗ
╠Ē╝ė╚ńŽ┬┤·┤aŻ║
using System;
using System.Collections.Generic;
using System.ComponentModel;
using System.Data;
using System.Diagnostics;
using System.Linq;
using System.ServiceProcess;
using System.Text;
namespace WindowsServiceTest
{
public partial class ServiceTest : ServiceBase
{
public ServiceTest()
{
InitializeComponent();
}
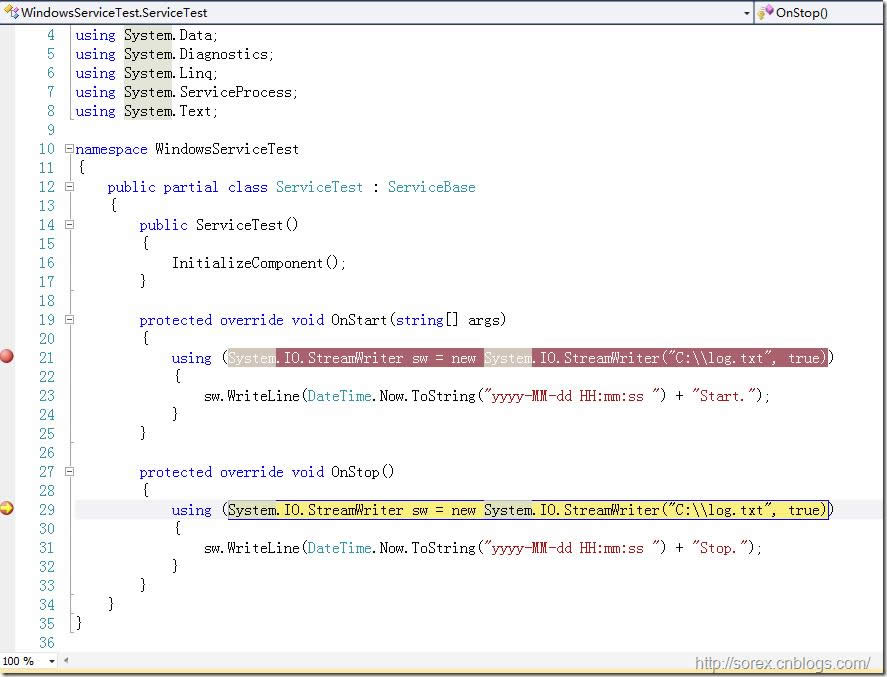
protected override void OnStart(string[] args)
{
using (System.IO.StreamWriter sw = new System.IO.StreamWriter("C:\\log.txt", true))
{
sw.WriteLine(DateTime.Now.ToString("yyyy-MM-dd HH:mm:ss ") + "Start.");
}
}
protected override void OnStop()
{
using (System.IO.StreamWriter sw = new System.IO.StreamWriter("C:\\log.txt", true))
{
sw.WriteLine(DateTime.Now.ToString("yyyy-MM-dd HH:mm:ss ") + "Stop.");
}
}
}
}
▀@└’╬ęéāĄ─▀ē▌ŗ║▄║åå╬Ż¼åóäėĘ■䚥─Ģr║“īæéĆ╚šųŠŻ¼ĻPķ]Ą─Ģr║“į┘īæéĆ╚šųŠĪŻ
╦─ĪóäōĮ©░▓čb─_▒Š
į┌ĒŚ─┐ųą╠Ē╝ė2éĆ╬─╝■╚ńŽ┬(▒žĒÜ╩ŪANSI╗“š▀UTF-8¤oBOMĖ±╩Į)Ż║
1Ż®░▓čb─_▒ŠInstall.bat
%SystemRoot%\Microsoft.NET\Framework\v4.0.30319\installutil.exe WindowsServiceTest.exe
Net Start ServiceTest
sc config ServiceTest start= auto
2Ż®ąČ▌d─_▒ŠUninstall.bat
%SystemRoot%\Microsoft.NET\Framework\v4.0.30319\installutil.exe /u WindowsServiceTest.exe
3Ż®░▓čb─_▒Ššf├„
Ą┌Č■ąą×ķåóäėĘ■äšĪŻ
Ą┌╚²ąą×ķįOų├Ę■äš×ķūįäė▀\ąąĪŻ
▀@2ąąęĢĘ■äšą╬╩Įūįąą▀xō±ĪŻ
4Ż®─_▒Šš{įć
╚ń╣¹ąĶę¬▓ķ┐┤─_▒Š▀\ąąĀŅørŻ¼į┌─_▒ŠūŅ║¾ę╗ąą╝ė╚ļpause
╬ÕĪóį┌C#ųąī”Ę■äš▀Mąą┐žųŲ
0Ż®┼õų├─┐õøĮYśŗ
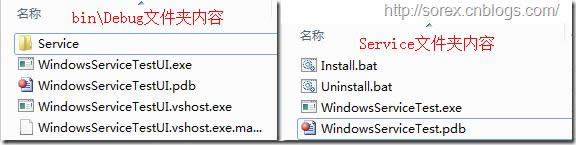
║åÜvę╗éĆą┬WPFĒŚ─┐Ż¼ĮąWindowsServiceTestUIŻ¼╠Ē╝ėī”System.ServiceProcessĄ─ę²ė├ĪŻ
į┌WindowsServiceTestUIĄ─bin\Debug─┐õøŽ┬Į©┴óService─┐õøĪŻ
īóWindowsServiceTestĄ─╔·│╔─┐õøįOų├×ķ╔Ž├µäōĮ©Ą─Service─┐õøĪŻ
╔·│╔║¾─┐õøĮYśŗ╚ńŽ┬łD
1Ż®░▓čb
░▓čbĢrĢ■«a╔·─┐õøå¢Ņ}Ż¼╦∙ęį░▓čb┤·┤a╚ńŽ┬Ż║
string CurrentDirectory = System.Environment.CurrentDirectory;
System.Environment.CurrentDirectory = CurrentDirectory + "\\Service";
Process process = new Process();
process.StartInfo.UseShellExecute = false;
process.StartInfo.FileName = "Install.bat";
process.StartInfo.CreateNoWindow = true;
process.Start();
System.Environment.CurrentDirectory = CurrentDirectory;
2Ż®ąČ▌d
ąČ▌dĢrę▓Ģ■«a╔·─┐õøå¢Ņ}Ż¼╦∙ęįąČ▌d┤·┤a╚ńŽ┬Ż║
string CurrentDirectory = System.Environment.CurrentDirectory;
System.Environment.CurrentDirectory = CurrentDirectory + "\\Service";
Process process = new Process();
process.StartInfo.UseShellExecute = false;
process.StartInfo.FileName = "Uninstall.bat";
process.StartInfo.CreateNoWindow = true;
process.Start();
System.Environment.CurrentDirectory = CurrentDirectory;
3Ż®åóäė
┤·┤a╚ńŽ┬Ż║
using System.ServiceProcess;


ServiceController serviceController = new ServiceController("ServiceTest");
serviceController.Start();
4Ż®═Żų╣
ServiceController serviceController = new ServiceController("ServiceTest");
if (serviceController.CanStop)
	serviceController.Stop();
5Ż®Ģ║═Ż/└^└m
ServiceController serviceController = new ServiceController("ServiceTest");
if (serviceController.CanPauseAndContinue)
{
	if (serviceController.Status == ServiceControllerStatus.Running)
		serviceController.Pause();
	else if (serviceController.Status == ServiceControllerStatus.Paused)
		serviceController.Continue();
}
6Ż®Öz▓ķĀŅæB
ServiceController serviceController = new ServiceController("ServiceTest");
string Status = serviceController.Status.ToString();
┴∙Īóš{įćWindows Service
1Ż®░▓čb▓ó▀\ąąĘ■äš
2Ż®ĖĮ╝ė▀M│╠
3Ż®į┌┤·┤aųą╝ė╚ļöÓ³c▀Mąąš{įć
Ų▀Īó░┤╔Ž╩÷▓Į¾EŠ═┐╔ęįųŲū„┐╔▀\ąąĄ─Windows ServiceŻ¼Å─Č°▀_ĄĮ┴╦╣żū„Ą─ąĶŪ¾ĪŻŽŻ═¹╬ęĄ─▀@éĆī”─Ńėą╦∙Ä═ų·ŻĪ
īW┴ĢĮ╠│╠┐ņ╦┘šŲ╬šÅ─╚ļķTĄĮŠ½═©Ą─ļŖ─Xų¬ūR

